Geological Model Related Solutions
scenes to be used
This document mainly introduces what functions can be used for the geological model after it is imported into SuperMap, what effect can be achieved, and what kind of application can it have in the project?
In SuperMap iDesktop, we can modify model colors in batches, edit and modify model textures. In SuperMap iClient3D for WebGL, we have also implemented a variety of geological body real-time analysis functions, including:
- 1. Real-time section analysis (real-time edge banding, obtain the ID of the sectioned object)
- 2. Real-time cropping (polygon cropping)
- 3. Real-time excavation (cylindrical, polygonal excavation)
- 4. Real-time expression (explosion, exaggeration)
- 5. Real-time construction of virtual drilling (real-time construction, real-time viewing)
function realization
This article introduces step by step from the following three aspects:
- 1. In SuperMap iDesktop, edit and modify the material of the geological model according to the project requirements;
- 2. Publish the edited data in UDB/UDBX format as a data service through SuperMap iServer;
- 3. In SuperMap iClient3D for WebGL, load the data service and realize the real-time analysis function of geological bodies.
1. Edit and modify the material of the geological model
If the imported geological body model has no material, or if you want to modify the material of the model, you can do it in SuperMap iDesktop.
Currently we provide three ways to edit materials:
- ①Through the "Material Browser" function, select the object to modify the material in real time;
- ②Through the function of "modify model material color in batches", modify the color of the model in batches according to the properties of the object;
- ③Use the "Material Editing" function to isolate the selected object and edit the material.
1.1、Through the "Material Browser" function, select the object to modify the material in real time
Let's take a Geo3DML file as an example to illustrate:
- ①Open the Geo3DML file with third-party software, and observe that its structure consists of three parts: Zone, Layer and Fault.
- ②Directly import the Geo3DML file through SuperMapiDesktop, and the number and type of objects in the obtained data set are consistent with the results seen in the third-party software.
- ③Here is how to edit and modify the material through the function of "Material Browser":
- ①Add a material property to the data set
- ②In the attribute table, set the attribute value of Color
- ③Through the function of modifying the material color of the model in batches, modify the material color of the model in batches
- ①Add the data set to be processed to the scene, select the object, right-click, and select the "Material Editing" function in the pop-up dialog box.
- ②The page jumps to the material editing interface. If the model has no texture coordinates, it cannot paste textures. Therefore, first recalculate the texture coordinates of the model. Repeat Mode Select the actual size, and set the appropriate "horizontal size" and "vertical size" according to the scope of the geological body, and then click "Apply to Model" below.
- ③After setting the texture coordinates of the model, you can set the texture. Click the material button at the top to pop up the material editing dialog box. Click the Add button under Texture Editing to add the corresponding texture picture. If it is not suitable, it can be replaced and deleted.
- ④ In the material browser, all materials in the current dataset are given. If you need to set an existing material for a new model, you only need to select the corresponding material in the material browser.
- ⑤ Click Save to Model to get a geological model with texture effects.
Among them, Zone has 4 objects; Layer has 5 objects, and Fault has 11 objects, a total of 20 objects. The model itself has no material information, and the color of the model seen at this time is randomly generated, not the actual color effect.

However, the imported model has no material information, and it is displayed as the default gray material.


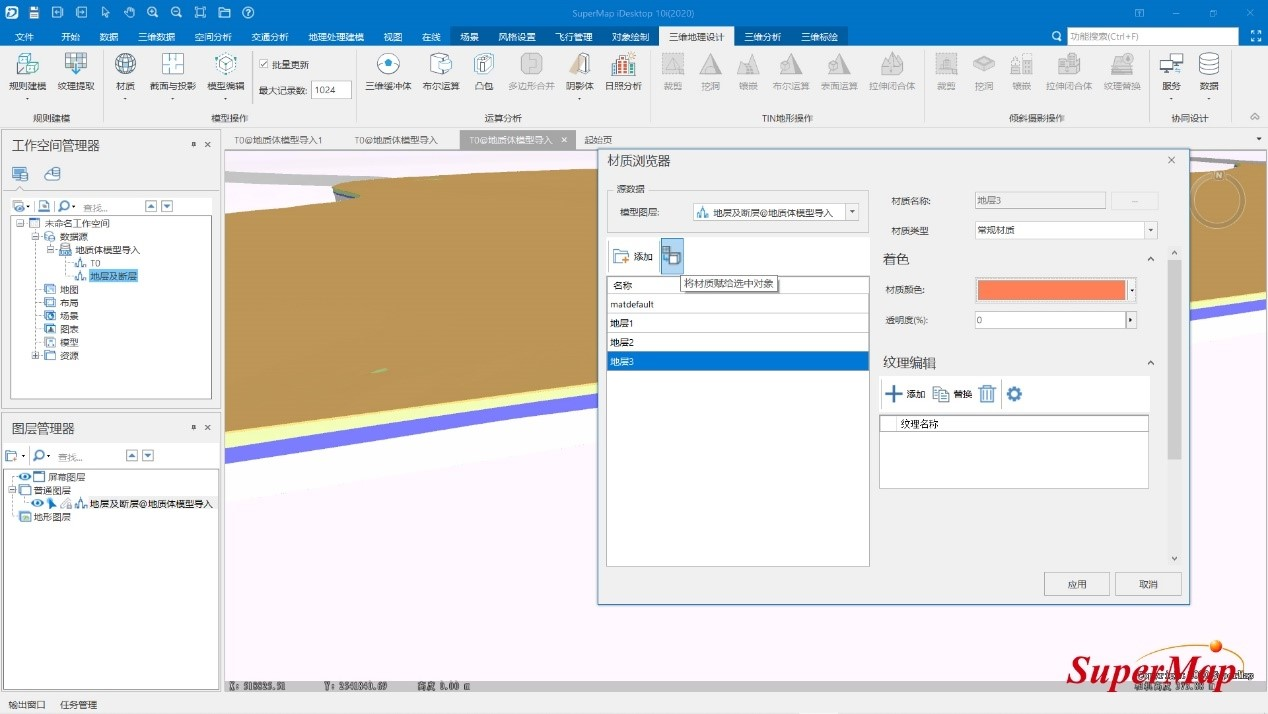
1. Click the "3D geographic design-model operation-material editing-material" button to pop up the material browser panel.
2. Click the "Add" button, and create a new material "stratum x", and set the material color and texture.
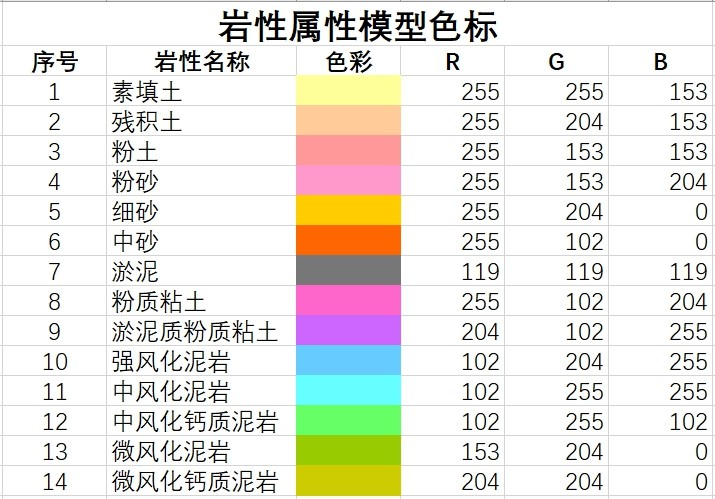
The RGB value of the material color can refer to the color scale shown in the figure below.

3. After setting the color and texture, select the object in the scene, and then click the "Assign Material to Selected Object" button to directly assign the set material to the corresponding object.
4. Select other objects in the scene one by one, and give them materials.

1.2, batch modify model material color
As shown in the picture below, another imported model has no color and texture.

The function of "modifying model material color in batches" supports filtering out objects of the same material according to the attribute information of model objects, and then assigning materials in batches.
If the imported data set itself already has the properties of recording materials, you can skip the first two steps and go to the third step. If there is no relevant material property, you need to add a material property first.
Select the data set, right-click the "Properties" button, and the property panel will pop up; in the property panel, click the "Add" button to add a new property. Add a text-type attribute here and name it "Color".

Select the data set, right-click "Browse Attribute Table", you can see that at the end of the attribute table, the "Color" attribute added in the previous step is displayed. According to the requirements of the project, assign it a value.

Click the "3D data-model processing-modify material color" function, in the pop-up "Modify model material in batches" panel, select "condition setting", and set the color of the model in batches by setting SQL expressions.


In the SQL expression panel, select the Color object and click Get Unique Value to get all the Color attributes, and then use the Color='color' expression to filter out objects of the same material.

Set the filter conditions and filter colors of different colors in turn, and finally click OK to generate a new data set with material colors.

1.3 Add or modify texture to the model
The function in 1.2 can only modify the color of the model, but cannot edit the texture of the model. If you want to add or modify the texture of the model, you need to use the "Material Editor" function.


1.4 Summary
The "Material Browser" function can select objects in real time to modify materials, and directly assign the prepared materials to the selected model, which is relatively close to the practice in conventional modeling software, which is convenient for material management and setting.
The "batch modify model material color" function can modify the color of the model in batches according to the attributes of the objects, which is suitable for data with a large number of objects, but does not support setting materials with texture maps.
With the "Material Editing" function, the selected object can be isolated and observed, and its color and texture can be modified. If the object is not easy to observe in the overall scene, it can be edited through this function.
The above three methods of editing materials have their own strengths. In actual use, choose according to the characteristics of the data.
2. Publish model data to data service
2.1 Publish the processed dataset as a data service through SuperMap iServer
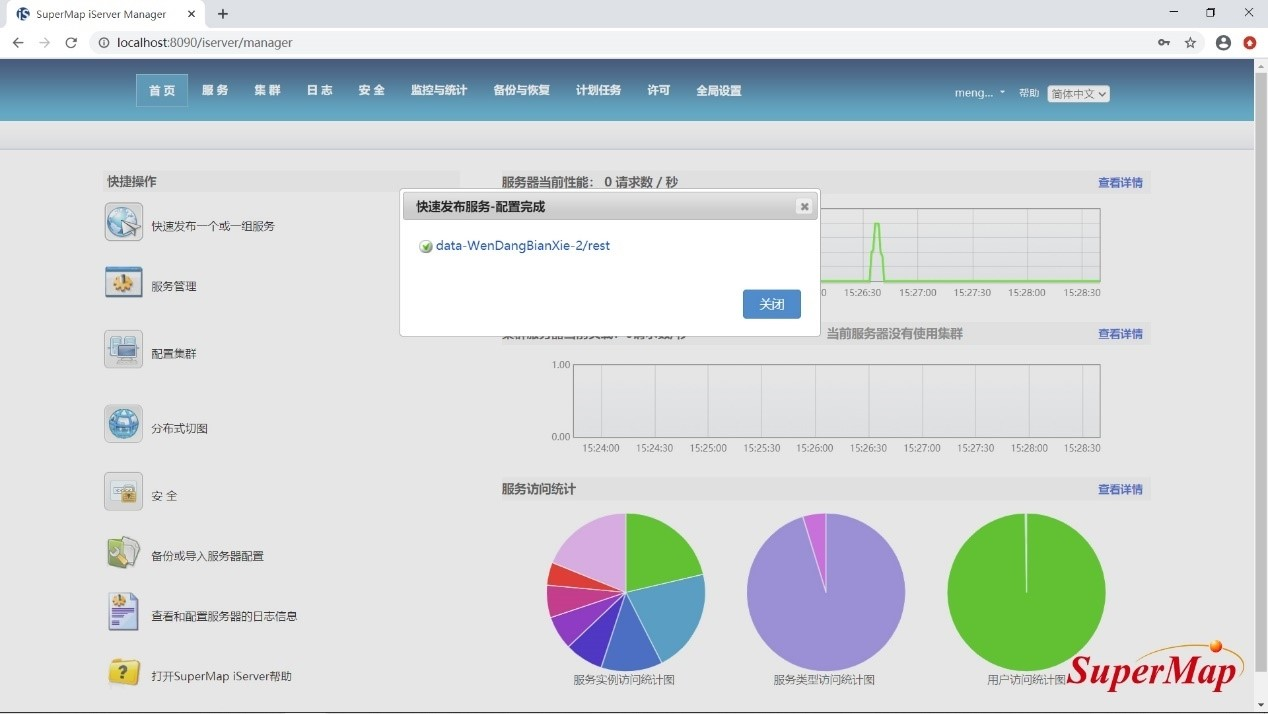
Start SuperMap iServer, enter the quick service creation page, click "Quickly publish a service or a group of services", and then select "Workspace" - "REST-Data Service".


After the publishing is successful, the page will pop up the "Quick Publishing Service-Configuration Complete" window.
2.2 Obtain the service address of the geological body object
Click to enter the service address in the configuration completion window, and then click to enter "data-datasource-data source name-datasets-dataset name-features". This page lists the number of elements of GEOMODEL under the current dataset. Here, there are 11 geometric objects under the demonstration dataset, so the number of elements is 11.
That is, the service address of the first geological model object under the dataset is: http://localhost:8090/iserver/services/data-WenDangBianXie-2/rest/data/datasources/data source name/datasets/data Set name/features/1.stream
The service addresses of subsequent model objects in the dataset are: http://localhost:8090/iserver/services/data-WenDangBianXie-2/rest/data/data sources/data source name /datasets/dataset name/features/2.stream


3. In SuperMap iClient3D for WebGL, load the data service and realize the real-time analysis function of geological bodies.
By citing the data released in the above steps, relevant real-time analysis functions can be realized according to the relevant interfaces provided.
3.1 Real-time profile analysis
In SuperMap iClient3D for WebGL, observe the internal structural shape of the geological body and the changes along the section plane by sectioning.
- Real-time sectioning example reference: http://support.supermap.com.cn:8090/webgl/examples/webgl/editor.html#geologicBodyOperation
- Real-time clipping sample reference: http://support.supermap.com.cn:8090/webgl/examples/webgl/editor.html#geologicBodyClip
- Live Excavation Example Reference: http://support.supermap.com.cn:8090/webgl/examples/webgl/editor.html#geologicBodyClip
- Real-time expression - exaggerated expression example reference: http://support.supermap.com.cn:8090/webgl/examples/webgl/editor.html#geologicBodyOperation
- Example reference for real-time construction of virtual drilling: http://support.supermap.com.cn:8090/webgl/examples/webgl/editor.html#geologicBodyClip

3.2 Real-time cropping
In SuperMap iClient3D for WebGL, the geological body can be clipped into any shape by clipping function.

3.3 Excavation in real time
In SuperMap iClient3D for WebGL, geological bodies can be excavated in any shape through the excavation function.

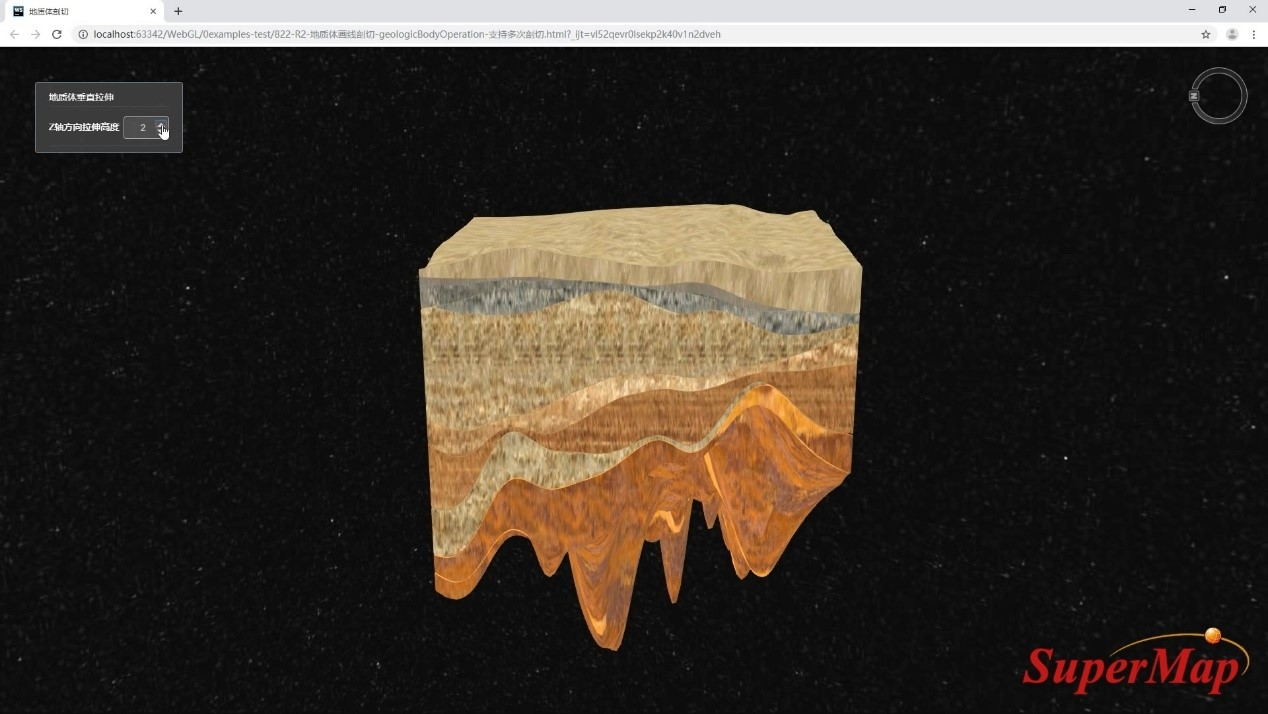
3.4 Real-time expression - exaggerated expression
In the actual scene, there may be such a situation: in the real scale, it is not easy to find and browse those objects with great geological significance but thin thickness; some geological bodies with large thickness but narrow range are also It is not convenient for overall browsing and observation. At this time, it is convenient to observe by changing the zoom of the model in the vertical direction.
3.5 Build virtual boreholes in real time
In SuperMap iClient3D for WebGL, the real-time virtual drilling function provided can simulate the effect of drilling a geological body.

3.6 Live Expression - Geological Explosion
Currently, there are two ways to do the geological explosion effect:
1. By way of data service
2. The method of loading local data through dynamic layer
First introduce the way of data service: the way of data service does not require further processing of the model data set, and the service obtained in step 2.2 can be used directly.
- ①The reference method of data is still the same as that in 3.1;
- ② Obtain each geological layer through the address of the model data stream, and then change the offset value of each layer on the z-axis to achieve the effect of explosion.
               $('#explode').click(function(){
                  	 var curInstance = solidModelsProfile._s3mInstanceCollection._group[modelUrls[0] +'.stream'].instances._array[0]
	                 var enu = SuperMap3D.Transforms.eastNorthUpToFixedFrame(
	                     curInstance.position,SuperMap3D.Ellipsoid.WGS84, new SuperMap3D.Matrix4()
	                     );
	                 var offset = new SuperMap3D.Cartesian3(0, 0, 900);
                     var newPos = SuperMap3D.Matrix4.multiplyByPoint(
                         enu, offset, new SuperMap3D.Cartesian3()
                         );
                     curInstance.updatePosition(newPos);
	                 curInstance = solidModelsProfile._s3mInstanceCollection._group[modelUrls[1] +'.stream'].instances._array[0]
                     enu = SuperMap3D.Transforms.eastNorthUpToFixedFrame(
                         curInstance.position, SuperMap3D.Ellipsoid.WGS84, new SuperMap3D.Matrix4()
                         );
                     offset = new SuperMap3D.Cartesian3(0, 0, 800);
                     newPos = SuperMap3D.Matrix4.multiplyByPoint(
                         enu, offset, new SuperMap3D.Cartesian3()
                         );
                     curInstance.updatePosition(newPos);
		 	  $("#reset").click(function(){
		 	      	 var curInstance = solidModelsProfile._s3mInstanceCollection._group[modelUrls[0]+'.stream'].instances._array[0]
	                 var enu = SuperMap3D.Transforms.eastNorthUpToFixedFrame(
	                     curInstance.position,SuperMap3D.Ellipsoid.WGS84, new SuperMap3D.Matrix4()
	                     );
	                 var offset = new SuperMap3D.Cartesian3(0, 0, -900);
                     var newPos = SuperMap3D.Matrix4.multiplyByPoint(
                         enu, offset, new SuperMap3D.Cartesian3()
                         );
                     curInstance.updatePosition(newPos);
	                 curInstance = solidModelsProfile._s3mInstanceCollection._group[modelUrls[1]+'.stream'].instances._array[0]
	                 enu = SuperMap3D.Transforms.eastNorthUpToFixedFrame(
	                     curInstance.position, SuperMap3D.Ellipsoid.WGS84, new SuperMap3D.Matrix4()
	                     );
	                 offset = new SuperMap3D.Cartesian3(0, 0, -800);
                     newPos = SuperMap3D.Matrix4.multiplyByPoint(
                          enu, offset, new SuperMap3D.Cartesian3()
                         );
                     curInstance.updatePosition(newPos);
How to load local data through dynamic layers:
Currently, the dynamic layer only supports loading files in .s3m and .s3mb format, and does not support files in .json format, so further processing of the model dataset is required.
In SuperMap iClient3D for WebGL, the position of the geological body object is determined by setting the model insertion point, so it is necessary to fill in the position coordinates of the model insertion point on the page. If the data is in a projected coordinate system, it is necessary to convert the projected coordinate system to a geographic coordinate system
and then obtain the coordinates of the insertion point of the model.
- ①Add the model to the spherical scene, select the object, right-click to edit the model, and the spatial position information of the model is given in the pop-up window.
- ②Select the function of 3D geographic design - model editing - coordinate zeroing, in the pop-up dialog box, add all the data sets that need to be processed, select "model absolute coordinate Z zeroing" to generate a new model data set.
- ③ Add the data set obtained in the previous step to the scene, select the model, right-click, and export the model command to export each layer of geological body as an s3m object.
- ④In SuperMap iClient3D for WebGL, realize the effect of geological body explosion through dynamic layers. The specific steps are as follows:


1. Create a new dynamic layer and add geological bodies to the corresponding dynamic layer.
		         var cell1 = '../data/Layer1.s3m';
		         var cell2 = '../data /Layer2.s3m'
		         …
                         var layer = new SuperMap3D.DynamicLayer3D(
                          scene._context, [cell1,cell2…]
                          );
                         layer.updateInterval = 500;//Dynamic layer update time
                         layer.enableLocalOffset = false;//Disable model local offsets
                         scene.primitives.add(layer)
2、Write the value of the insertion point obtained in step ①
		         var points = [
                         [11x. 000,3x. 000,-46.56],
                         …
                         ];
3、Set the color and other information of the geological body. If you already have a color, you don’t need to set it again
		         var point1 = points[0];
                         var cellState1 = new SuperMap3D.DynamicObjectState({
                     	 id:1, longitude: point1[0],
                    	 latitude: point1[1],
                    	 altitude: point1[2],
	                     color:new SuperMap3D.Color(94/255, 179/255, 59/255, 1)
                         });
4、Control the offset of each dynamic layer individually
		           document.getElementById("explode").onclick = function() {
		            	 keymap[cell1][0].altitude =keymap[cell1][0].altitude+5000;
		                 keymap[cell1][0].lockOrientation = true;
		                 layer.updateObjectWithModel(
		                       cell1, keymap[cell1
		                       ])
                             …
                             }
- Live Expression - Geological Explosion Paradigm Reference: http://support.supermap.com.cn:8090/webgl/examples/webgl/editor.html#geologicBodyExplode

The explosion effect achieved through data services, the movement of the geological model has no transition effect; the movement of the geological model has a smooth transition effect through the way of loading local data through dynamic layers.
Remarks
1. When editing model materials, SuperMap iDesktop 10i (2020) version is required to have the function of the material editor.
2. The real-time analysis function of geological bodies mentioned in the document needs the SuperMap_iClient3D_10i(2020) version to support it.
3. The coordinate system of the data set must be a geographic coordinate system. If it is a projected coordinate system, it needs to be converted into a geographic coordinate system before operation.
4. iServer requires version 10.12