Loading operation manual of oblique photogrammetric model
Overview
The oblique photographic model can display the real physical world in an all-round and full-element manner. It has become an important data source for 3D GIS due to its high precision, high efficiency, high realism and low cost. The full range of SuperMap GIS products support oblique photography models, and in order to optimize the transmission and analysis of models in a network environment, SuperMap iClient3D for WebGL (hereinafter referred to as WebGL client) uses a three-dimensional tile cache (*.S3M) format to store and publish model data. Improved the performance and efficiency of WebGL client browsing oblique photography models.
This document mainly describes the detailed operation process of WebGL client to browse oblique photography model data. The main operation process is as follows:
Operation flow
The following will use the sample data MaSai for detailed operation demonstration.
1. Generate configuration file
Operation instructions
The "Generate Configuration File" function can generate a *.scp format model configuration file for multiple original oblique photography models in *.osgb format stored in multiple folders, it records the relative path, name, insertion point position and coordinate system information of the oblique photography model file.
If you already have a configuration file in *.scp format, you can skip this step and proceed directly to 2. Generate S3M data.
Steps
(1). In the "Tilt Photography" tab of the SuperMap iDesktop desktop product, click the "Generate Configuration File" button, as shown in the figure below.

Figure 1 Click the "Generate Configuration File" tool
(2). The "Generate Oblique Photography Configuration File" dialog box pops up, as shown in the figure below.
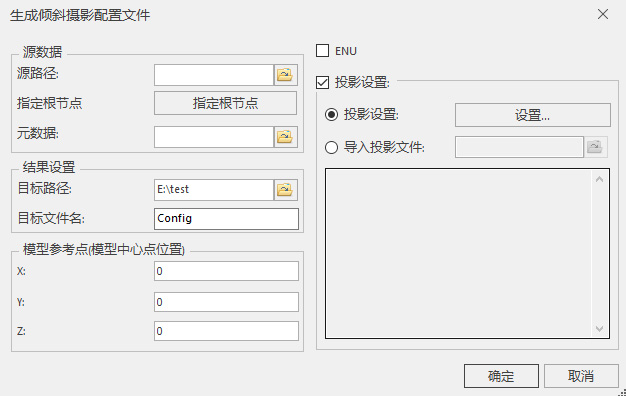
Figure 2 "Generate Oblique Photography Configuration File" dialog box
(3). In the dialog box "Source Data", set the following:
- Source path: Click the file browse button on the right, and select the folder where the OSGB data is located in the pop-up "Browse Folder" dialog box, or directly enter the OSGB data location in the text box Folder path.
- Specified root node: Supports setting the specified root node. Click the "Specify Root Node" button, and the "Specify Root Node" dialog box will pop up, displaying the file path, and you can delete and add root node files. The system will automatically read all the root node data under the folder path, as shown below:
- Metadata: A *.xml file that stores the EPSG code, insertion point and other information of the data. Open the metadata here, and the desktop will automatically read the insertion point and coordinate system information.
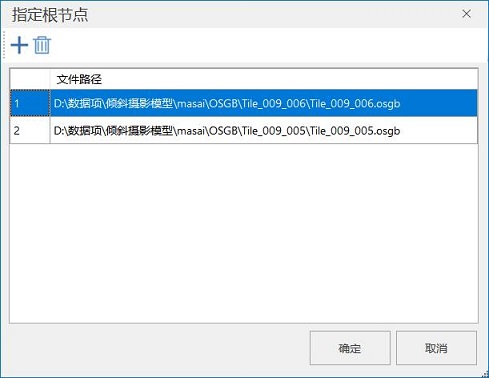
Figure 3 "Specify Root Node" dialog box
(4). In the dialog box "Result Settings", set the following:
- Target path: Select the path where the *.scp file is saved.
- Target file name: Enter the *.scp file name. The default name is "config".
(5). Set the X, Y, and Z values at "Model Reference Point" in the dialog box. The default model reference point is (0,0,0).
- "Model reference point" refers to the position of the center point of the oblique photographic model, where X represents longitude, Y represents latitude, and Z represents elevation.
(6). If the oblique photogrammetric model is in the ENU coordinate system, check "ENU". Otherwise, check "Projection Settings" and set the projection information of the *.scp file. Currently, two methods are provided:
- Projection Settings: When you select the "Projection Settings" radio button, click the "Settings..." button on the right, the "Coordinate System Settings" dialog box will pop up, select a projection as the target The coordinate system of the file.
- Import projection file: When you select the "Import projection file" radio button, click the file browse icon button on the right, and in the pop-up "Select" window, select the projection information file and import it. can. At the same time, the coordinate system details of the selected projection file will be displayed in the text box below.
(7). If the oblique photogrammetric model requires coordinate conversion, check the "Coordinate Conversion Parameter Setting" check box to set the target coordinate system and reference system conversion settings. The parameter settings are as follows:
- Target coordinate system: Set the target coordinate system for coordinate conversion. The operation process is the same as "Projection Setting", please refer to step (6).
- Reference system conversion settings: Set the conversion method and projection conversion parameters. The "Conversion method" is selected by clicking the drop-down arrow button on the right. Currently, 11 conversion methods are provided, namely: Geocentric Translation(3-para), Molodensky(3-para), Abridged Molodensky(3-para), Position Vector(7-para), Coordinate Frame(7-para), user-defined, Bursa-wolf(7-para) , MolodenskyBadekas(10-para), China_3D_7P(7-para), China_2D_4P(4-para), PROJ4 Transmethod. For the projection conversion parameters, click the "Settings" button, and the "Projection Conversion" dialog box will pop up, as shown in the figure below, for detailed parameter settings.
Figure 4 "Projection Conversion" dialog box
(8). After setting the above parameters, click the "OK" button to execute the configuration file generation operation.
Operation results
After the operation is completed, a *.scp file is generated under the target path, as shown in the figure below:
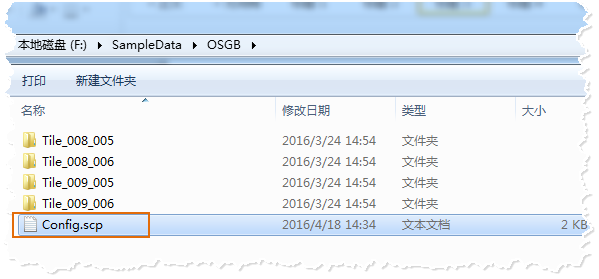
Figure 5 Generate OSGB cache result
2. Generate S3M data
Operation instructions
The *scp configuration file generated in the previous step records the relative path, name and other information of the tilt model file, and the "Generate S3M Data" function which take oblique photographic data to reconstruct LOD, texture compression, model singulation and modify the center point of the model, etc., to realize batch processing of oblique photographic models and integrat processing of oblique operators, and to support multi-threading。
Steps
(1). Open SuperMap iDesktop, and click "Tilt Photography" in the "Data Processing" group of the "S3M Data" tab; as shown below.

Figure 6 Click the "Tilt Photography" tool
(2). The "OSGB->S3M" dialog box pops up, as shown in the figure below.
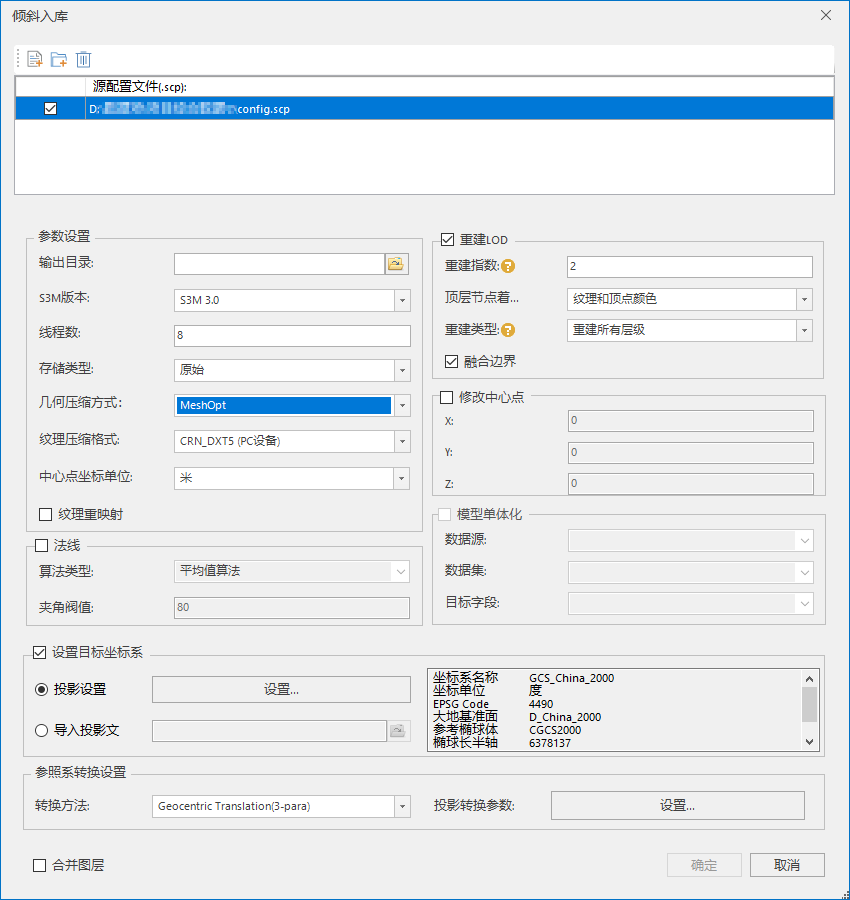
Figure 7 "OSGB->S3M" dialog box
(3). In the dialog box "Source configuration file", click "Add scp configuration file", and in the pop-up "Open" dialog box, select the *.scp file, or click the "Open all scp files in the folder" button to add the source configuration file.
(4). In the dialog box "Parameter Settings", the parameter settings are described as follows:
- Output directory: Set the path for storing the result data.
- S3M Version: Support three S3M version numbers, including S3M1.0, S3M2.0, S3M3.0, It is recommended to use the latest S3M3.0. If you are using a WebGL package prior to 10.21 load the skewed cache file. It is recommended to use S3M1.0 when tilting into the warehouse.
- Number of threads: Set the number of threads for inclined storage operations, the default is 8.
- Storage type: If it is necessary to encrypt oblique photography, the storage type must be compact. If you store tilted cache files in MongoDB, the storage type must be primitive.
- Geometric compression method: At present, four compression methods are provided, and the time required for compression is in order from shortest to longest, no compression, conventional compression, Draco compression, and MeshOpt.
- Texture compression: The default DXT (PC device) compression method. Currently supports five compression types: WebP, DXT (PC equipment), CRN_DXT5 (PC equipment), PVRTC (iOS series equipment), ETC (Android series equipment), no compression. For data of different purposes, using different texture compression methods can reduce the amount of video memory used by texture images.
- WebP: Applicable to the universal compressed texture format on the Web/PC. The total amount of data is reduced and the transmission performance is improved.
- DXT (PC equipment): Applicable to the general compressed texture format on PCs (personal computers). The video memory usage is reduced and the rendering performance is improved, but the total amount of data will increase.
- CRN_DXT5 (PC equipment): It is suitable for the general compressed texture format on PC (personal computer), the video memory usage is slightly reduced, the total amount of data is greatly reduced, but it requires a longer processing time .
- Standard CRN: Reduce video memory usage and reduce the total amount of data. It takes longer than CRN_DXT5 to process the same data.
- KTX2.0: Reduce video memory usage and reduce the total amount of data. It takes longer than standard CRN to process the same data.
- Center point coordinate unit: Set this parameter according to the configuration file center point coordinate unit. For example: if the coordinate unit of the center point of the original configuration file is METER, then select meters for this parameter。
- Texture remapping: Used to solve the unreasonable texture splicing in part of the inclined data and improve performance. Not checked by default.
(5). In the dialog box "modify center point": Optional, after checking "modify center point", set the X, Y, Z coordinate values of the model center point.
- The coordinates of the oblique photogrammetric model are determined by the label of the configuration file (*.SCP) and the coordinate information of the data itself. When loading multiple data of the same survey area, since each data has its own center point coordinates, it needs to be loaded separately Multiple SCP configuration files. "Modify model center point" is used to solve the problem of multiple center points of oblique photogrammetric data in the same survey area by modifying the coordinate information of the data itself, and realize the requirement of loading all data in one SCP configuration file. Not only that, but also supports multiple model batch Modify the center point.
(6). In the dialog box "Rebuild LODs": After checking "Rebuild LOD", set the rebuild index.The reconstruction index is used to set the number of merges, the default value is 1, and the system will rebuild a block file by 4^n blocks. After checking "Boundary Fusion", the boundary effect between the oblique photographic data tiles can be weakened, mainly for oblique photographic data with a small amount of intersecting tile boundaries.
(7). "Rebuild Type": Rebuild Type: Rebuild All Levels is a reconstruction level for the original OSGB oblique photographic model. Rebuilding only the top layer is to re-designate the finer layer data as the new root node for the S3MB data whose top layer effect is not good after reconstruction, and then rebuild the top layer.
(8). In the dialog box "Model singularization": Optional, after checking "Model singulation",set the data source where the vector plane superimposed on the model is located , Data set and target field. For more information, please refer to "Compression and Singleization" in SuperMap iDesktop 11i Help.chm.
(9). There are currently two ways to set the projection:
- Projection settings: Get or set the original coordinate system of the data. When the "Projection Settings" radio button is selected, click the "Settings..." button on the right, and the "Coordinate System Settings" dialog box will pop up. Choose a projection as the coordinate system of the target file. For specific operations to set the target projection, please refer to "Projection Settings" in SuperMap iDesktop 11i Help.chm.
- Import projection file: When you select the "Import projection file" radio button, click the file browse icon button on the right, and in the pop-up "Select" window, select the projection information file and import it. can. At the same time, the coordinate system details of the selected projection file will be displayed in the text box below.
(10). After setting the above parameters, click the "OK" button and wait for the oblique builder to be completed.
Operation Result
The operation result of "Generate S3M data" is shown on the right side of the figure below. This step generates a target folder consistent with the original file structure; open any model folder respectively, and you can see the OSGB format model and the S3M format model one by one The corresponding relationship is as shown in the figure below.
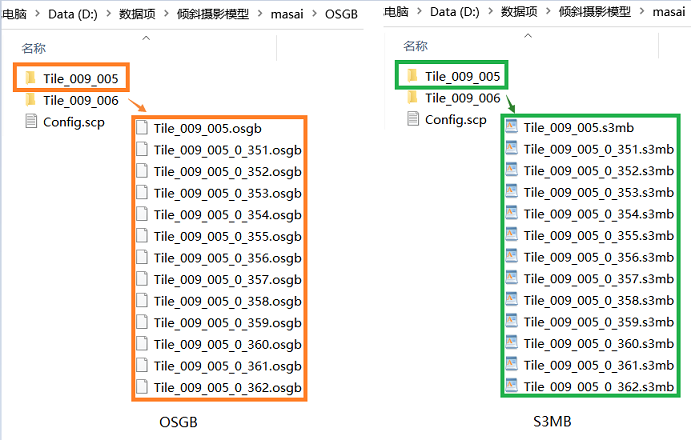
Figure 8 The result of generating S3M data (picture right) and the corresponding relationship of the model
3. Publish 3D service
Operation instructions
In the previous step, the configuration file of the oblique photographic model was generated, and then the oblique photographic model was published to a local or remote server in the form of a three-dimensional service to realize Web network resource sharing.
Steps
(1). In the "Workspace Manager" of the SuperMap iDesktop desktop product, under "Scene", right-click "New spherical scene".
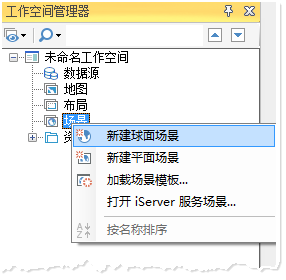
Figure 9 New spherical scene
(2). Select "Common Layer" under "Layer Manager", and right-click "Add OSGB cache layer ", select the *.scp configuration file.
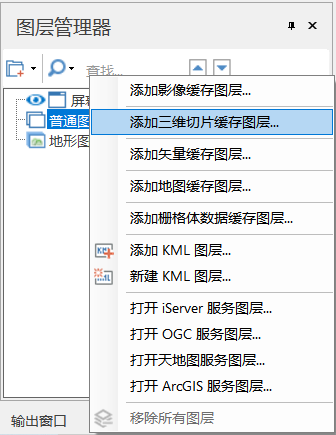
Figure 10 Add OSGB cache to the scene
(3). After loading the data, directly save the scene and workspace.
(4). After saving the workspace, in the %SuperMap iServer_HOME%/bin directory, click the "startup.bat" batch file to start the SuperMap iServer service.
(5). Open the browser, enter http://localhost:8090/iserver/manager in the address bar and enter "Service Management" page, click the "Quickly publish a service or a group of services" button under "Home".
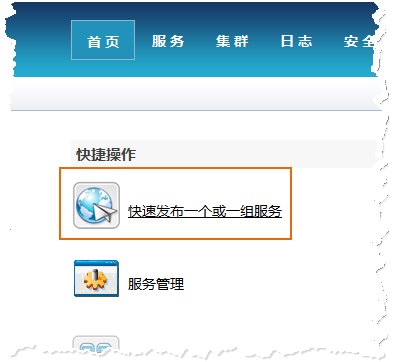
Figure 11 Quickly publish one or a group of services
(6). The "Quick Publish Service-Select Data Source" dialog box pops up, select "Data Source" "Workspace", click "Next".
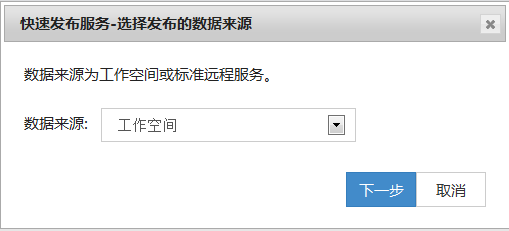
Figure 12 Data source selection workspace
(7). The "Quick Publish Service-Configuration Data" dialog box pops up, click "Remote Browse" button to select the previously saved workspace, click "Next".
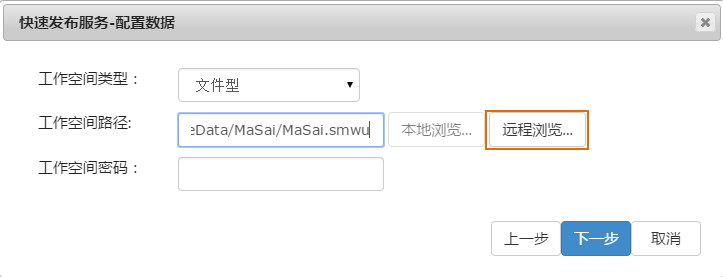
Figure 13 Select workspace configuration data
(8). "Quick Publish Service-Select the type of service to publish" dialog box pops up, check "REST -3D Service", click "Next".
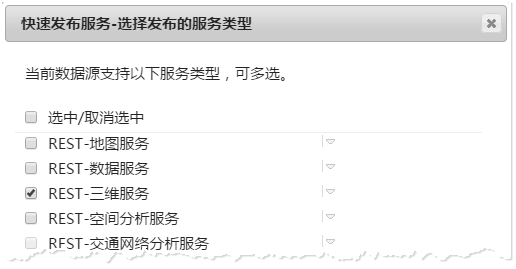
Figure 14 Check the 3D service
At this point, the service publishing has been configured. Follow the prompts to click the "Finish" and "Close" buttons.
Result of the operation
After the service is published, the 3D service will be displayed in the service list, as shown in the figure below.
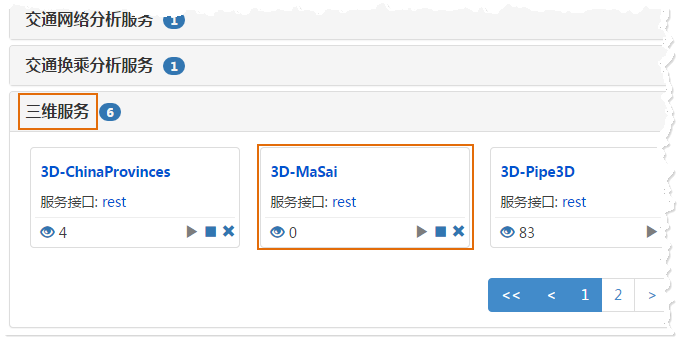
Figure 15 shows newly released services under 3D service
44. Client-side browsing oblique photography model
Operation instructions
After publishing the 3D service, you can browse the terrain data through the WebGL client in this step.
Reminder: Please store the WebGL product package in the %SuperMap iServer_HOME%/webapps directory before operation.
Steps
(1) Obtain the 3D data url address, click to obtain in the following order:
- Enter the service list page (http://localhost:8090/iserver/services), find and click the 3D service published in the previous step;
- Go to the "Root Directory" page and click "realspace";
- Go to the "3D service root node(3D)" page, click "datas";
- Go to the "3D data list(datas)" page, click "Config";
- Go to the "3D data resources(data)" page, click "Get 3D data configuration file", the following figure appears Page, copy the urladdress in the address bar of the browser.

Figure 16 Copy URL address
(2) Enter the storage path of WebGL product package (%SuperMap iServer_HOME%/webapps), under the "examples" folder, open "S3MTiles.html "For example, modify the content as shown in the figure below.

Figure 17 Modify some parameters of the example
- Modify the scene. addS3MTilesLayerByScp () function: modify the address to the just copied urladdress, and Change the name.
- Modify the Supermap3D.Cartesian3.fromDegrees() function: its parameters are the position of the center point of the oblique photographic model, which are respectively longitude, latitude and elevation. Please change toscpThe insertion point coordinates in the file, which are used to locate the position of the oblique photographic model during flight.
(3) Open the "S3MTiles.html" webpage in localhost, and the browser input address is: http://localhost:8090/%WebGL product package%/examples/ S3MTiles.html
Operation Results
After opening the webpage, the camera flies to the position of the tilted photography model, the display effect is as follows:
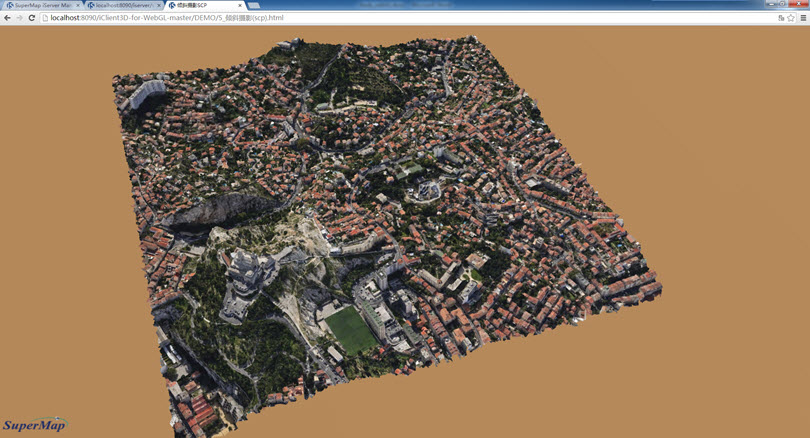
Figure 18 WebGL browsing oblique photogrammetric model effect